Blog Post 5:
https://edci337uvic12.opened.ca/category/multimedia/edci337-skills/
https://learningmultimedia.opened.ca/#module-5
Blog Post 4:
Blog Post 3:
https://learningmultimedia.opened.ca/#module-3
Welcome to my site for EDCI 337!
Blog Post 5:
https://edci337uvic12.opened.ca/category/multimedia/edci337-skills/
https://learningmultimedia.opened.ca/#module-5
Blog Post 4:
Blog Post 3:
https://learningmultimedia.opened.ca/#module-3
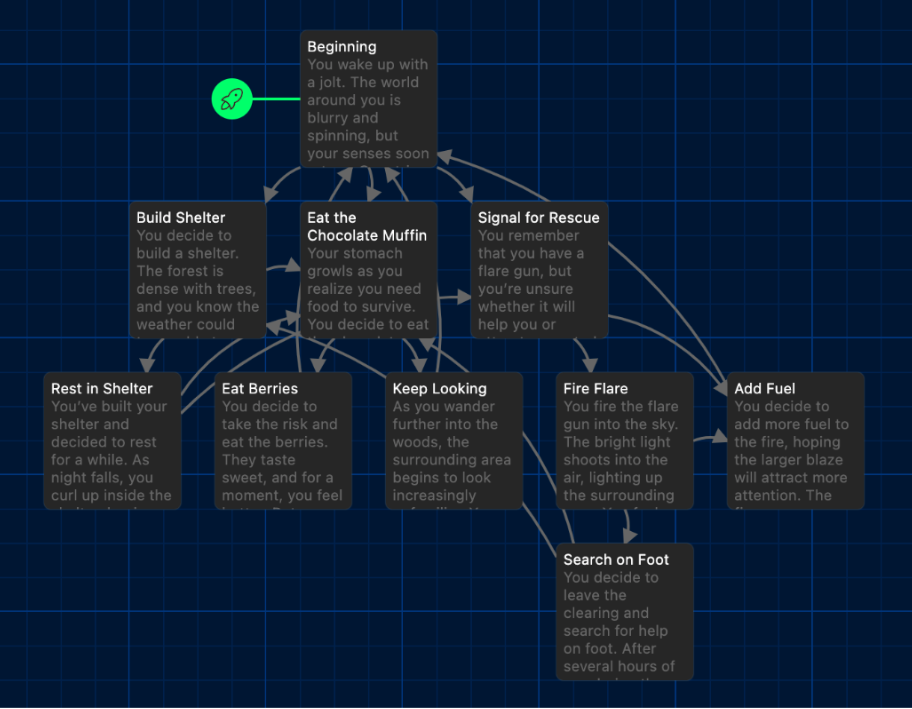
Link to Story:
https://twinery.org/2/#/stories/97d316b1-b14a-401f-a498-a0bd9fd2375c/play

Link to Script and Storyboard:
https://docs.google.com/document/d/1uQJGNmK-Q9n0EtnzrBffD-5iWPYXk7DQHtET6ZZZfFM/edit?usp=sharing
The storytelling techniques that come most easily to me are character development, emotional appeal, and dialogue. I tend to naturally focus on developing characters as developing well-rounded characters can help make a story feel personal and engaging. I also find it interesting to consider how a character’s backstory, desires, and flaws influence their decisions.
Emotional storytelling also comes easily to me as creating tension, empathy and surprise can create moments that resonate with the imagined audience and increase the memorability of your story. Writing dialogue that feels authentic to each character also comes easily to me as I can use conversations to reveal more about characters’ personalities and relationships.
Alternatively, some storytelling techniques require more work and practice. I often struggle with adequate pacing, as balancing the flow of the story is something I find challenging. I sometimes get lost in details or character development and I need to work more consciously on ensuring that the plot progresses at an engaging pace.
I also struggle to integrate world-building seamlessly into the story. I often spend too much time on the plot and characters, and don’t allow enough time to develop the environment of the story.
By increasing my awareness of my strengths and weaknesses when storytelling, I can develop new techniques to improve these skills.
Twine offers a unique learning opportunity by placing learners in positions where they must make choices that directly impact the story’s outcome. This encourages critical thinking as learners must weigh the consequences of their choices and consider how different decisions can lead to different outcomes. Branched narratives also provide learners with a sense of agency, in which they can explore the cause and effect of various decisions. The ability to shape the direction of their experience can lead to increased engagement and a deeper understanding of the learning experience. Finally, after navigating the branches, learners can reflect on how their decisions shaped the story. This encourages them to think about decision-making processes and the impact of their choices in both fictional and real-world contexts.
Learners might come across branching narratives through multiple avenues. Choose-Your-Own-Adventure Books are a popular example of branched narratives as readers must make decisions to determine the book’s plot. Many video games, especially role-playing games, also use branched narratives to give players control over their journey. Finally, some educational platforms or corporate training modules also use branched narratives to help users learn through decision-making in real-world scenarios. For example, medical training simulations or conflict resolution scenarios often use branched paths to show the consequences of different actions in specific situations. Branched narratives, in any form, are a powerful way to engage learners in the process of storytelling, allowing them to actively engage in the learning process.
I really enjoyed your Canva infographic! I think you used both contrast and hierarchy very effectively, as well as spacing.…
This is such a thoughtful reflection! I love how you broke down both the lesson design using Merrill’s principles and…
Great post! I love how you’re focusing on improving accessibility and sharing your process with the WAVE tool. It’s amazing…
Hi Ami, I really enjoyed watching your video. It was very engaging and the editing style was captivating. I love…
Hi Ami, Your blog post is both insightful and practical, especially in how you apply Merrill’s principles to address a…

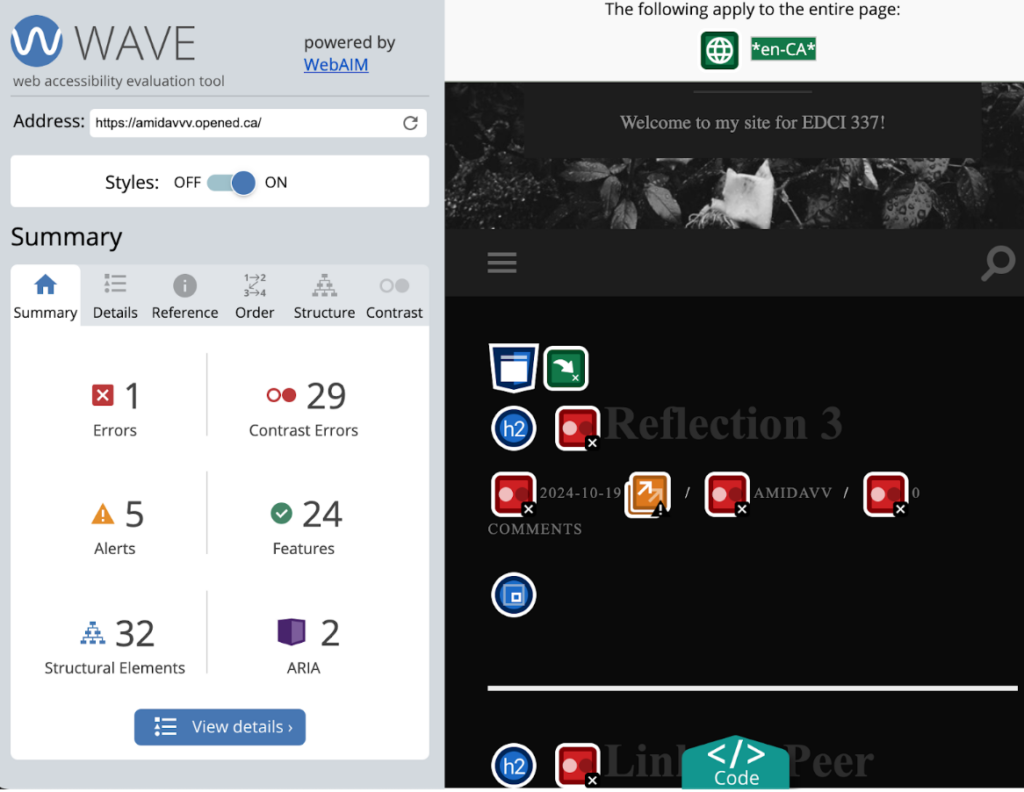
After creating the WAVE accessibility check, I was surprised to discover the various ways in which I can improve the accessibility of my site. I plan to improve the visibility of text and ensure that all images have appropriate text descriptions. This will enhance user experience and accessibility going forward.

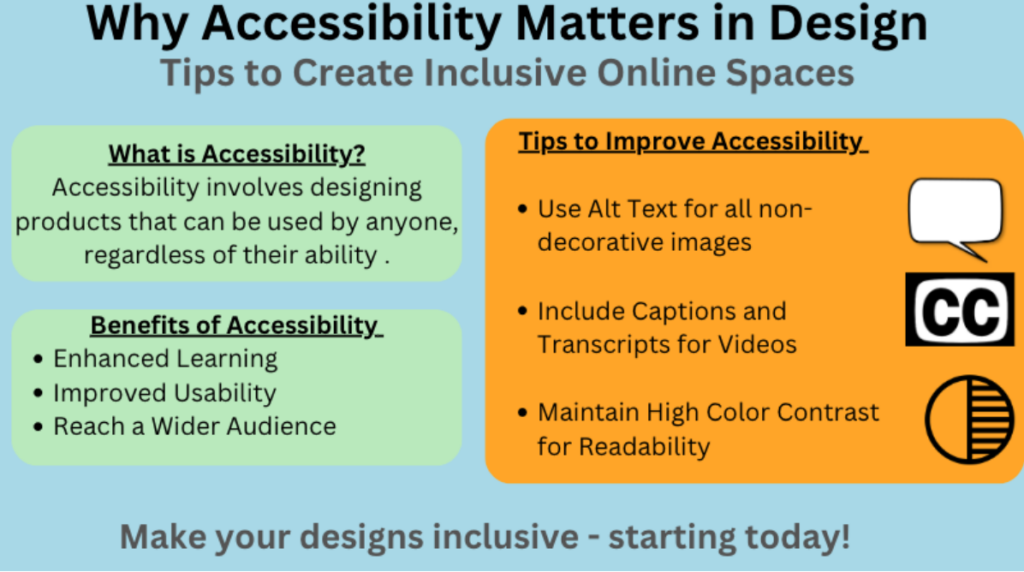
Question One: Which design principles did you follow to create your infographic in Canva? Which elements of a ‘good infographic’ were you able to incorporate? What other principles did you consider? What does using a template or generated design make easier and what does it make harder when creating your infographic? Did your target audience influence your choices?
When creating my infographic, “Why Accessibility Matters in Design,” I followed several fundamental design principles to enhance clarity and engagement. One key principle was hierarchy, which I established using varying font sizes and boldness for titles and section headers. This will help to logically guide the viewer’s eye through information. I also focused on alignment by ensuring that all elements, such as text and icons, were neatly arranged and consistently spaced. This organization helps enhance readability, making the information more digestible to readers.
I also incorporated a cohesive color palette of soft blues, greens, and accent oranges, which creates an inviting visual experience while ensuring proper contrast for readability. I also included relevant icons and illustrations to break up text and convey concepts visually. This not only maintains interest but also reinforces the content, catering to various learning styles.
While using a template in Canva simplified the design process by providing a structured layout, it also posed some challenges. Templates can sometimes restrict creativity or limit customization, making it harder to convey a unique brand or personal style. However, the time saved in formatting and layout decisions allowed me to focus more on content development, which is often the most crucial aspect of an infographic.
My target audience for this assignment was design students similar to myself. This significantly influenced my choices as I aimed to create a visually appealing yet educational tool that not only informs but also motivates students to consider accessibility in their work.
Question Two: Graphic design is inherently visual – what additions or modifications could you make to ensure that learners with visual impairments have access to the same information in an infographic in an online setting?
To enhance accessibility for learners with visual impairments, I would consider several modifications. First, providing a text-only version of the infographic would ensure that key information is accessible to screen readers. Additionally, using high-contrast colors and larger, clear fonts can aid those with low vision.
In summary, by applying essential design principles and considering accessibility modifications, I created an infographic that effectively communicates its message to a diverse audience while being mindful of inclusive practices.
You must be logged in to post a comment.
I really enjoyed your Canva infographic! I think you used both contrast and hierarchy very effectively, as well as spacing.…
This is such a thoughtful reflection! I love how you broke down both the lesson design using Merrill’s principles and…
Great post! I love how you’re focusing on improving accessibility and sharing your process with the WAVE tool. It’s amazing…
Hi Ami, I really enjoyed watching your video. It was very engaging and the editing style was captivating. I love…
Hi Ami, Your blog post is both insightful and practical, especially in how you apply Merrill’s principles to address a…
| Big Idea | Learning Outcome(s | Evidence of Learning | Assessments | Learning Activities |
| This course will effectively teach students about various factors that contribute to anxiety and mental health challenges in today’s youth. | By the end of the course, learners will be able to..-Explain the key psychological processes that influence adolescent anxiety.-Identify common environmental contributors to anxiety in adolescents-Discuss effective intervention strategies. | Individuals’ learning outcomes will be evaluated by their ability to.. -Accurately describe psychological processes that may contribute to anxiety-Apply appropriate intervention strategies to hypothetical scenarios. | Learners will be assessed by..-Three Short Quizzes-One Critical Thinking Topic Assignment-One Test | Interactive Lecture: Presentation on adolescent psychological development and mental health challenges, followed by discussions and Q&A sessions. Group Discussions: Small groups will participate in discussions on misconceptions and real-life applications of intervention strategies. |
1. What authentic problem would you use to design a lesson using Merrill’s principles? What media or multimedia (interactive or not) would you create to support it?
In this lesson, I would present students with a hypothetical case study of an adolescent struggling with anxiety. The key problem would be:
“Given a case study, which psychological and environmental factors could be contributing to their condition, and what intervention strategies would you recommend?”
This is an authentic problem because it reflects real-world challenges that mental health professionals, educators, and caregivers face when helping adolescents with anxiety. The case study would provide students with a realistic scenario where they can practically apply their knowledge. This would help them refine their problem-solving and critical thinking skills to develop greater understanding of adolescent mental health.
Using Merrill’s principles, my lesson design would look similar to the following.
An example of scaffolding includes the time I wrote my first academic research paper. Writing a research paper can be a daunting task, especially when you’re unsure of what’s to be expected of you. In my experience, the whole process was broken down into manageable steps, and I got the support I needed at every stage to gradually build my skills. Here’s how the process unfolded:
Step One: Getting Started
At the beginning, the professor introduced the assignment, outlining everything we needed to know. The professor clearly outlined the structure, citation style, and expectations of the assignment. This instruction helped me get a clear understanding of what my final product should like like, and the steps I needed to take to get there.
Step 2: Picking a Topic
Choosing a focused, researchable topic was challenging for me. My first idea was to write about climate change, but I wasn’t sure how to focus this topic. I ended up narrowing my topic to “The Impact of Climate Change on Coastal Cities,” which felt both manageable and interesting.
I drafted an early thesis and the professor provided feedback to help me refine and clarify my topic.
Step 3: Finding Resources
The professor taught us how to use library resources and evaluate sources. I learned advanced search techniques to find relevant, peer-reviewed articles, ensuring I used credible sources for my paper.
Step 4: Organizing the Paper and Writing the First Draft
Once I had my sources, it was time to figure out how to organize my research into a clear argument. I created my outline, highlighting the main points I’d discuss in each section and matching them to the sources I’d be using. My professor gave me feedback, suggesting that I clarify some transitions and add a counterargument to strengthen my paper.
Step 6: Peer Feedback
Before submitting the full draft, we did a peer review. The professor gave us a detailed rubric to guide our feedback, focusing on clarity, organization, and the strength of our evidence. This clear instruction helped make the peer-review process both structured and useful.
Step 7: Final Revision and Submit
After receiving peer feedback, I revised my paper and met the professor individually to discuss any questions.
I submitted the paper, feeling much more confident than when I first started. When the professor gave feedback on my final submission, I was able to see how much I had improved the clarity and strength of my argument.
Conclusion
Looking back, this step-by-step scaffolding process helped me tackle what could have been an overwhelming task. Each stage of the assignment built on the last, and the feedback at every step gave me the guidance and confidence I needed to improve. By breaking the project into smaller, manageable chunks, I felt supported throughout the entire process and developed skills that I have kept with me to this day.
You must be logged in to post a comment.
I really enjoyed your Canva infographic! I think you used both contrast and hierarchy very effectively, as well as spacing.…
This is such a thoughtful reflection! I love how you broke down both the lesson design using Merrill’s principles and…
Great post! I love how you’re focusing on improving accessibility and sharing your process with the WAVE tool. It’s amazing…
Hi Ami, I really enjoyed watching your video. It was very engaging and the editing style was captivating. I love…
Hi Ami, Your blog post is both insightful and practical, especially in how you apply Merrill’s principles to address a…
© 2025 Ami Davv's Site
Theme by Anders Noren — Up ↑
Leave a Reply
You must be logged in to post a comment.